Have you ever wondered on how to integrate any form of captcha to protect your Strapi endpoints? I sure did, turns out it’s not really that difficult, and now I shall share that knowledge. 😎️
Requirements
- A text-editor of your choice
- Knowledge of Strapi & Node.js
- Any front-end knowledge, but for this guide it’s React.js
- An account for hCaptcha
- Roughly 10 minutes of your time ⏲️
Why hCaptcha? (optional)
Why specifically hCaptcha and not Google’s reCAPTCHA? Well, the simple answer is that Google made the reCAPTCHA system paid. Besides, with hCaptcha, you’ll be writing less code. Trust me.
Right, with that outta the way, let’s get to coding.
Hosts File
Before we truly begin, you should know that hCaptcha doesn’t work with both 127.0.0.1 and localhost which means we have to modify our Hosts file. To do that, we need to fire up our terminal.
Linux
Usually, it’s located in /etc/hosts which is pretty easy to modify.
$ sudo nano /etc/hostsWindows
On Windows, it’s in C:\Windows\System32\Drivers\etc\hosts , so open up Notepad or any text-editor as Administrator and modify that file.
MacOS
Mac is pretty similar to Linux in that you’ll just need a terminal.
$ sudo nano /private/etc/hostsAdd New Entry
You can really go with whatever name you like for the Hosts, but for this example we’ll just go with what the hCaptcha documentation to keep things consistent.
127.0.0.1 test.mydomain.comLet’s proceed to the first real step of getting things done.
Strapi Setup
First thing you’ll need to do is to create a directory where we’ll be creating our source files. When you’re done with that, create a new instance of Strapi, specifically the lightweight variant that doesn’t need a database.
$ yarn create strapi-app cms --quickstartOnce it finishes building your dashboard, create your account and then login. We will proceed to creating a new Collection Type.
Contact Form Collection Type
We won’t be sending emails or anything. We’re just going to store them in our CMS. To do that, we’ll simulate a contact form that takes in a Name and Message field. Just those two.

It’s up to you if you want to make any of the fields required, because there are other ways to validate input from the client, which we’ll get to later.

After this you may need to go to Settings>Roles and allow the Public role to create Contact Form Entries.
This endpoint will now accept POST requests at http://localhost:1337/contact-form-entries.
Secret Key
Go to your hCaptcha dashboard and go to the Settings tab, from there you can go ahead and copy your secret key, which will be important in the verification of the captcha score within the server.
At the root of the Strapi source directory, go to Config>Server.js, open that up and that’s where we’ll create an entry for our Environment Variable.
The object key hcaptchaSecret can be accessed using Strapi’s dot notation later. Right, once we’re done, let’s move on to building the front-end.
React Setup
React isn’t a strict requirement, but that’s what I’m going to use for this guide. So let’s get to setting that up right now.
$ yarn create react-app websiteNext we’re going to add some required dependencies. (react-hook-form and axios are optional)
$ yarn add axios @hcaptcha/react-captcha react-hook-formBuilding A Simple Form
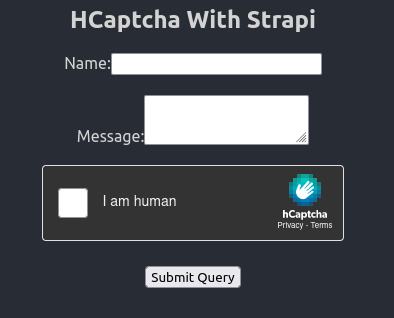
This won’t be the nicest form we’ve built but it gets the job done. We just need two fields, a Name and Email field. Then beneath those two text input fields will be the hCaptcha component itself.
Something like this shouldn’t be too bad. We’ll go over the variables and functions provided in a bit. Make sure to grab your Site Key from your hCaptcha dashboard.
The input tags there have the register spread out and have their keys defined as both name and message respectively. And at the bottom is our button to submit the form.
The <HCaptcha /> component needs that aforementioned site key. Next, the onVerify prop takes in a dispatcher hook from useState which we haven’t defined yet. Same thing with those onExpire and onError props. The theme prop is optional, but I like the look of the dark theme.
Handling Submissions
We can’t quite start the app yet, we’ll need to provide the state and a way to handle the forms. I’m using React Hook Forms but you can use whatever you like, or handle it the old fashioned way, up to you.
We then define our token state which initializes to null . We destructure our useForm() hook’s handleSubmit and register so we can use our forms. The submissions handler just checks if there isn’t a token, before going on with an attempt to send our data. We then assign some keys with Axios in our POST request. Really simple stuff.
It should look something like this. Okay, we’re actually done with the React stuff. Let’s get to writing the validation code for our hCaptcha. 😁️
Strapi Policies
Strapi has a really neat system for inserting your own middlewares known as Policies. This is precisely where we’ll put our logic to validate our hCaptcha token, as well as our input fields — as we can’t rely on client-side validation alone.
Node.js Token Verification
Stop your Strapi process in the terminal and install the node-hcaptcha integration.
$ yarn add hcaptchaVerify The Captcha Score
From the root of your Strapi project, we’ll create a new policy called verifyCaptcha.js in config/policies/.
Let’s break down what’s going on with this script:
The first thing to note is that Strapi is using Koa underneath, which means we can access the Request object within the Context ctx.
Next, we grab our Secret Key with strapi.get.config('server.hcaptchaSecret') and store it in a much shorter variable name that we can use for later.
We grab our token from the client by accessing the ctx.request.body object that contains the Token key that we created earlier at the client.
You can definitely destructure the body object to grab the token, like I did with the Name and Message fields. Whichever approach you like the best is most certainly the best option.
The rest of the logic is as follows:
- We check for empty input fields and halt the transaction as bad request if there are any.
- If the token is not found, stop the transaction and return as bad request.
- Within our try-catch block, we destructure the results of
verify()and await its verdict. - On success, return a status 200 then pass the transaction to the next handler.
- On failure, return bad request.
- If anything goes wrong within checking, the
catchwill throw a status 500.
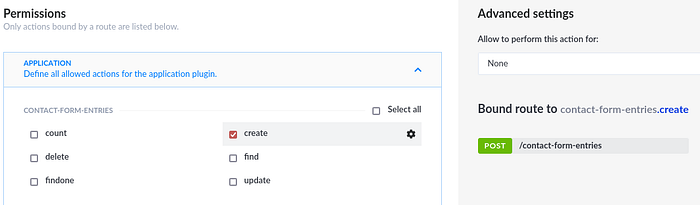
Apply The Policy
Back at the root of your Strapi source directory, go to api>contact-form-entries>config>routes.json.
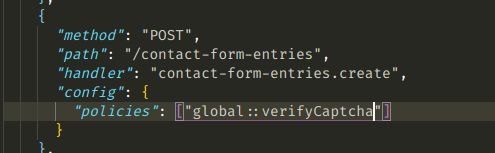
Over at the POST method, you can see an empty array called policies. Simply add the global policy that we’ve just created and add the filename without the file format.
And yeah, that’s it! Easy right? 😃️👍️
Testing The Form Captcha
Having the hCaptcha is good and all, but now we need to test it. Fire up Strapi once again with yarn develop and login, then have that tab standby at the Contact Form Entries.
Next, we fill out the forms with some convincing test data.

Hitting send should give you the alert that the message was sent. Checking with our CMS we should see that the message made its way to our server.
But what if something failed? Now purposefully failing the captcha matching image test won’t give you your token. So if somehow you sent the POST request to the endpoint anyway but without the token, will the server throw an error? Let’s find out!
Postman
We’re going to send a POST request using Postman, and craft some JSON fields to test our endpoint. You can also use cURL, if you like to stick with the terminal.
Set the URL bar to POST and point it to http://localhost:1337/contact-form-entries then we’ll send a field that doesn’t really belong to our contact form.
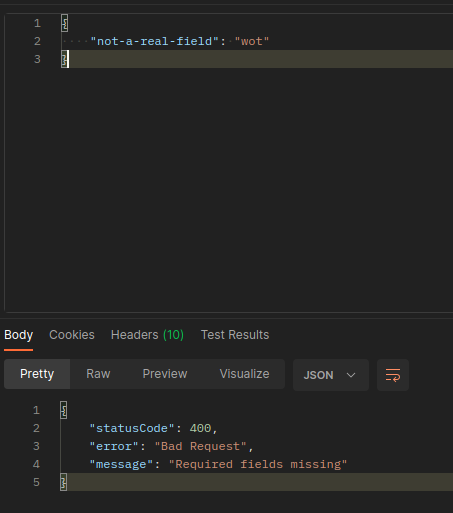
As you can see we get our bad request response as expected. Let’s try crafting a legitimate message, but without the required token.
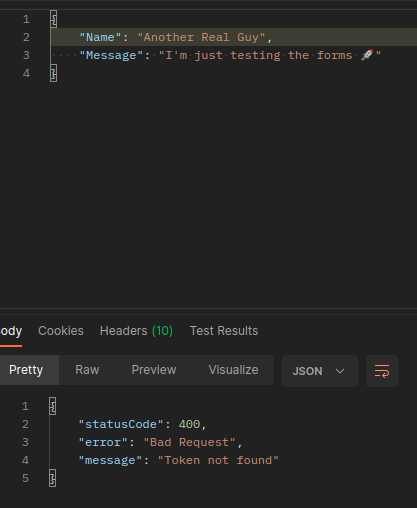
Attempting to send it yields the expected “token not found” bad request response. This is good. Let’s fake the token field next.
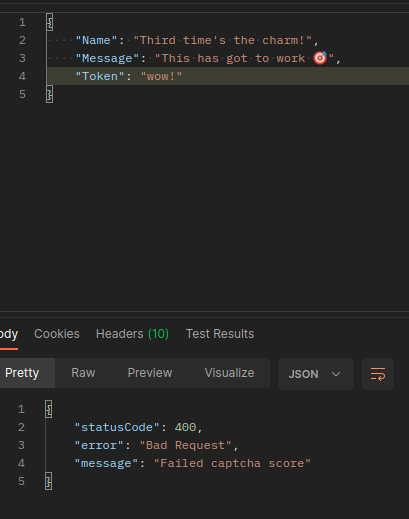
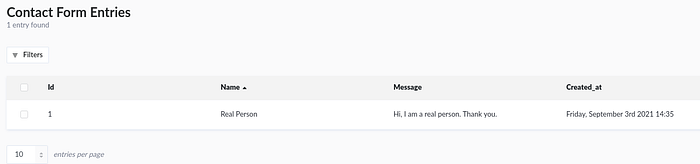
Unsurprisingly we fail the captcha score because our token is not real. This is great, but did any of them get through? Let’s check out our CMS tab right now.
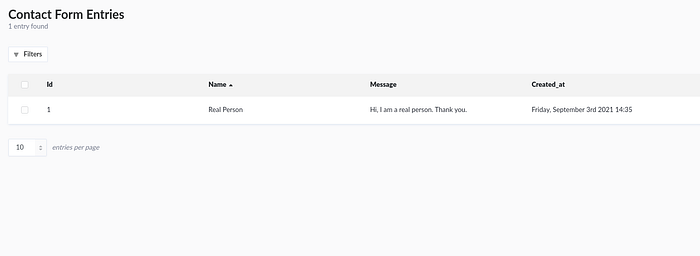
You should see on your end that it’s still just the one successful attempt from before. Which means our hCaptcha system works! 🤩
What’s Next?
Actually, that’s it. But now you’re on your way to protect the rest of your routes in Strapi, armed with new knowledge. If you like the content and would want to support me, feel free to get me a cup of coffee. ☕️
Otherwise, a clap for the article would be greatly appreciated! 😄
